Armstrong DLW
Linoleum
Installation
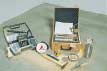
One of the most important precon-
ditions for successful installation is
careful work according to preparation.
Testing the moisture content of the
substrate and checking temperature
and relative humidity in the room.
The sheets are cut to size, marked,
loosely re-rolled and placed upright to
acclimatize to conditions in the room.
The loosely-laid sheets are cut in,
around a radiator in this case, after
ensuring the subfloor is flat and smooth.
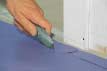
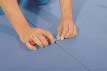
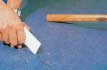
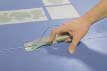
Trace the shape of a doorpost to the
linoleum with the help of a scribing bar.
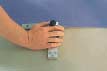
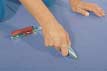
Trimming the top edge with a hooked
knife.
Rubbing down the sheets with a
rubbing iron, a device covered with
needle felt…
Milling out the joint.
The floorcovering is cut along the sco-
red contours.
The seam should never fit too tightly.
There should be a space of approx.
0.5 mm between adjoining edges
when sealing.
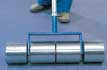
… or with a lino roller which, due to
the gauge of the rollers, exercises
sufficient pressure even where slight
irregularities occur.
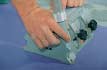
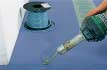
Sealing with a manual welder.
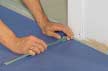
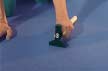
Cutting the first edge of the sheet
is best done with a linoleum edge
cutter or strip trimmer.
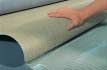
Folding back the trimmed sheets,
either half-way back in the case of
rooms or lengthways in the case of
corridors etc…
Remaining air bubbles should be
rubbed down with an appropriate
smoothing tool.
For large contract projects it is worth
using an automatic welding machine.
The safest way of cutting a seam:
mark the top sheet with an under
and over scriber guided along the
trimmed edge.
Adhesive must be applied in such
a way that the strips of adhesive
cover the entire backing of the floor-
covering.
A useful tip if the trapped air cannot
be forced out laterally: make a small
hole with the point of a blade in a dark
section of the pattern, press out the
air and once again firmly rub down
the covering at this point.
The weld rod is trimmed in two
operations, first with the trimming
guide fitted, then with the bare blade.